
Most of the Magento stores online utilize Google Ads to market their products online and increase conversions. Google Ads is a very powerful marketing tool which lets you build and display customer oriented Ads which increases the chances of a purchase on your store. It drives traffic and increases your brand awareness as well. Enhanced conversions is one of the powerful tools under Google Ads arsenal which helps you improve the conversion tracking on your Magento store. Furthermore, it increases the accuracy of conversion measurement using PII information (customers personal information such as name, email, etc.). Today we will integrate Magento 2 Google Ads Enhanced Conversion with GTM using Magento 2 Google Tag Manager extension.
Integrate Magento 2 Google Ads Enhanced Conversion with GTM
We need to perform the Following steps in order to ensure the optimum setup:-
- Enable Enhanced Conversion in Google Ads
- Identify the page URL where conversion event occurs
- Ensure the PII data is collected on the conversion page either through data layer or through code using Javascript.
- Setup the Google Ads enhanced conversion tag in GTM
Enable Enhanced Conversion in Google Ads
Please follow the steps below to enable Enhanced Conversions in Google Ads:-
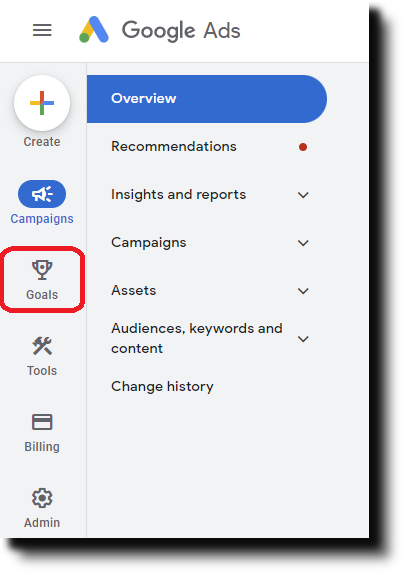
- Go to your Google Ads account and from the left menu select Goals.
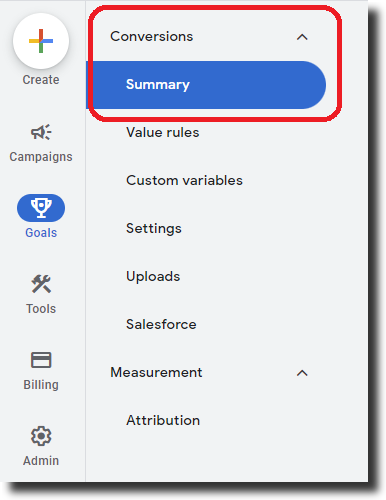
- From the left menu click on summary under Conversions
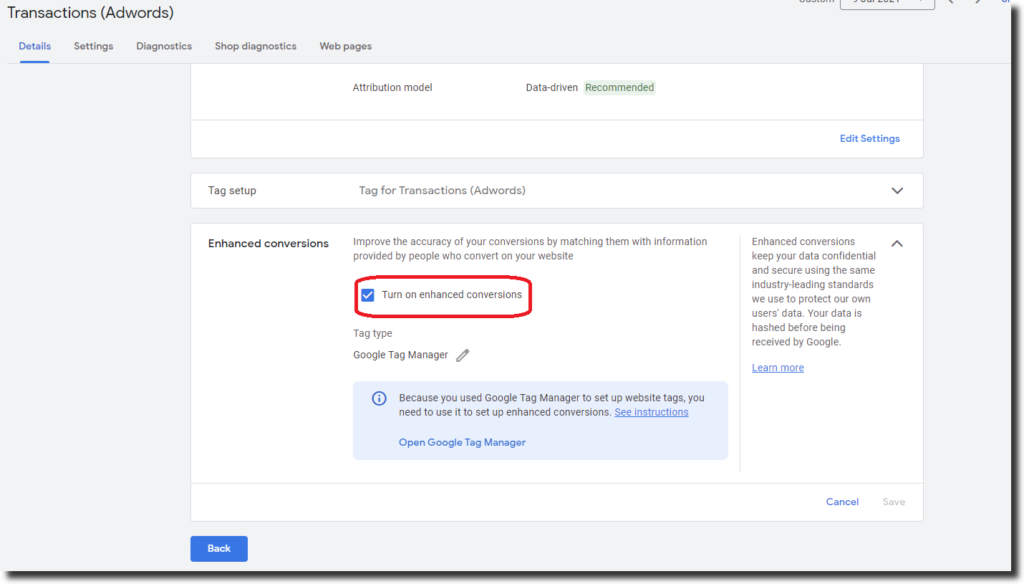
- Click on the conversion action that you want to use to set up enhanced conversion. Scroll down and under the Enhanced Conversion section, click on the checkbox against ‘Turn on Enhanced Conversion’.
- Under the ‘Implementation method’ select ‘Google Tag or Google Tag Manager’
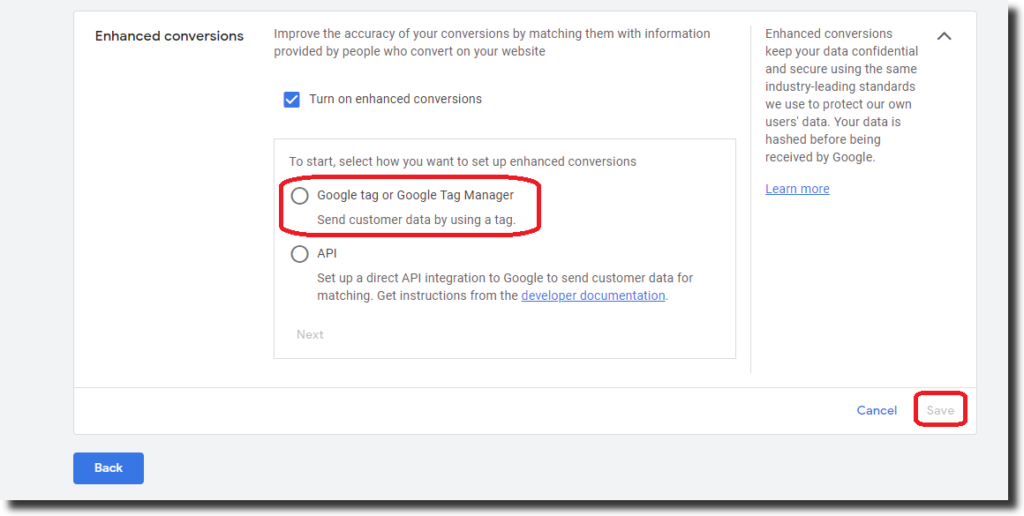
- Enter your Website’s URL and click on ‘Check URL’
- Finally click save button to save your settings and move on to set up the tag in Google Tag Manager.
Identify the page URL where Conversion event occurs
There are different methods to set up the Google Ads enhanced conversion with GTM depending upon how conversions occur on your store. You must identify where the conversion event is happening as well as where the PII data is entered by the user. Generally on Magento stores purchase events occur on the order success page and the PII data is entered on the checkout. We must set up our event tag to fire on the order success page.
PII Data
The first party personal information of the customer is entered in the checkout steps and is a step before the order success page or the purchase event. Our extension Magento 2 Google Tag Manager collects the PII data using a Global Javascript object which is populated on the success page. We will use the user-provided data event tag in the tag manager to map and use this PII data with our Enhanced Conversion tag. Alternatively you can implement the code to collect the PII data from your store by yourself and use this guide to set up the tag.
Setup the Google Ads enhanced conversion tag in GTM
Follow the steps below to create Google Ads Enhanced Conversion tag:-
- Go to your GTM container and from the left menu select Tags and click on New to create a new tag. Enter the name of the tag as ‘Google Ads Conversion tracking’ and click on ‘Tag Configuration’
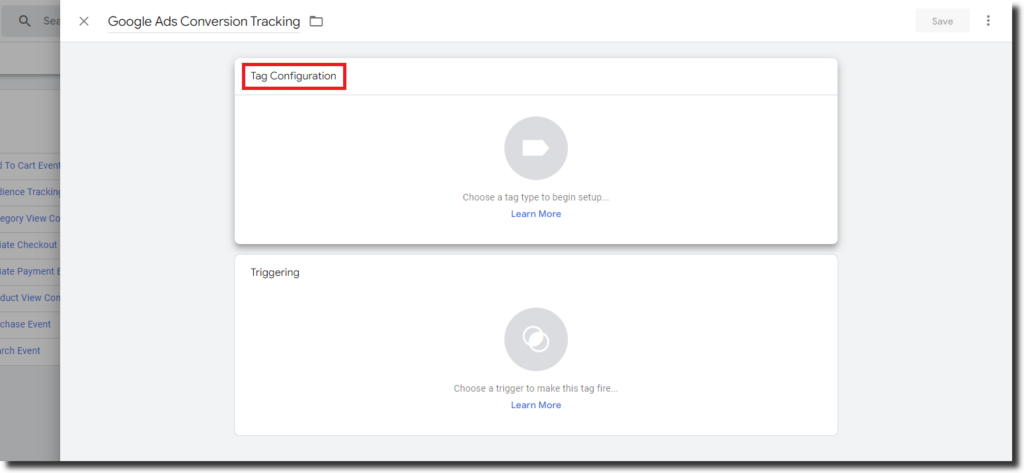
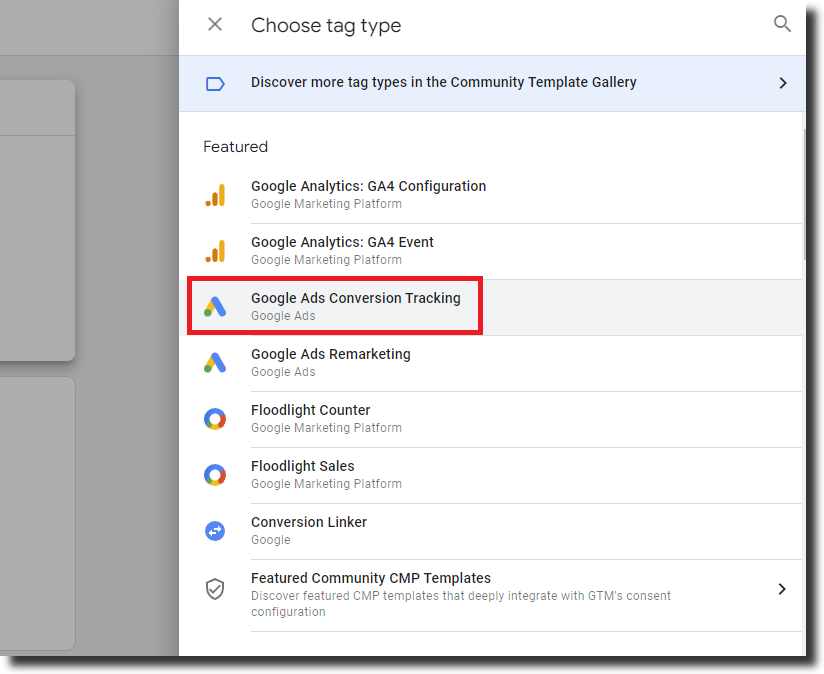
- In the ‘Tag Type’ section select “Google Ads Conversion Tracking’.
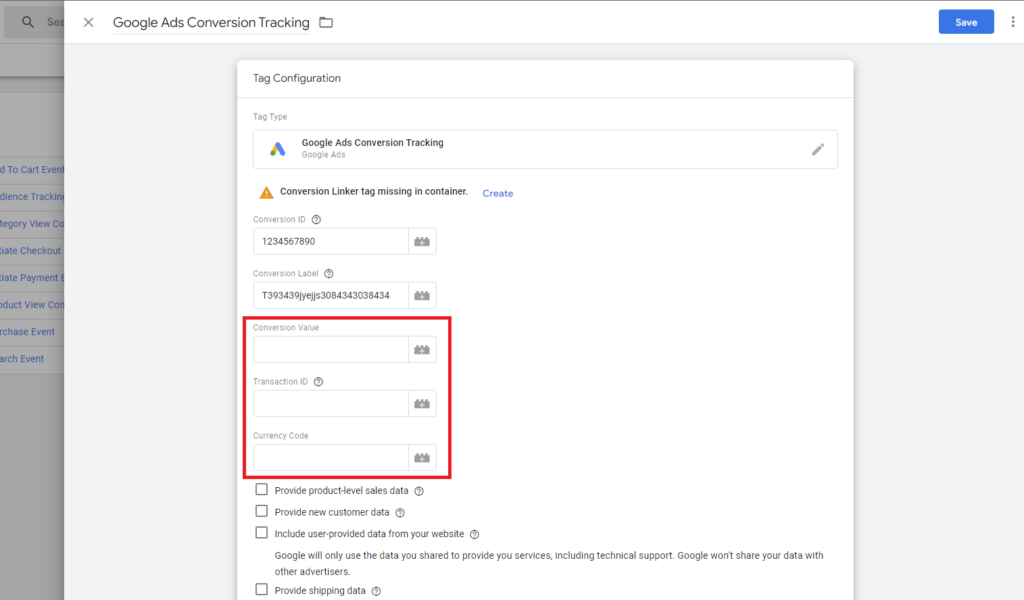
- Enter the ‘Conversion ID’ and ‘Conversion Label’ found in your Google Ads account.
- Under the conversion Value, Transaction ID, and Currency code, select the appropriate variables that store this information from the data layer.
Passing PII data to Google Analytics Conversion tracking tag
If we skip this step then too our tag will work but it will only be Google Ads Conversion Tracking, enhanced conversion requires us to collect and send hashed PII data with the tag. With our GTM module you have the option to choose how the data layer gets pushed on the store either as a Javascript variable or data layer.

First make sure that the following configuration is enabled Admin>System>Configuration>Scommerce Configuration>Tracking Base>Enable Enhanced Conversion. The PII data gets pushed as a data layer or a Javascript variable which is again configurable by setting Admin>System>Configuration>Scommerce Configuration>Tracking Base>Send Conversion Data using data layer to “Yes”. When set to “No” the Javascript variable gets pushed.
Collect PII data using Global Javascript Variable
- Before moving on to the next step we will create a variable that collects PII data from our Global Javascript object. To do this, create a new variable named ‘USER-DATA’ in GTM and select the variable type as ‘Custom Javascript’.
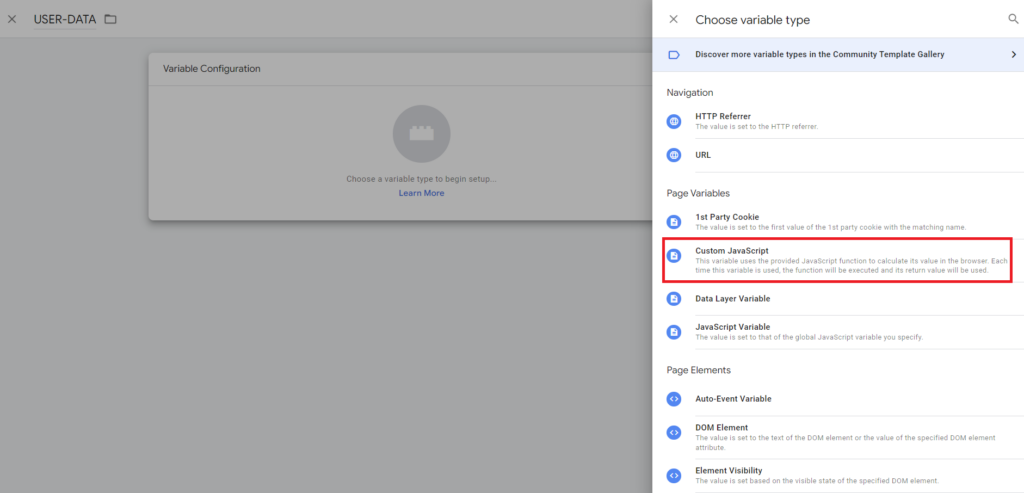
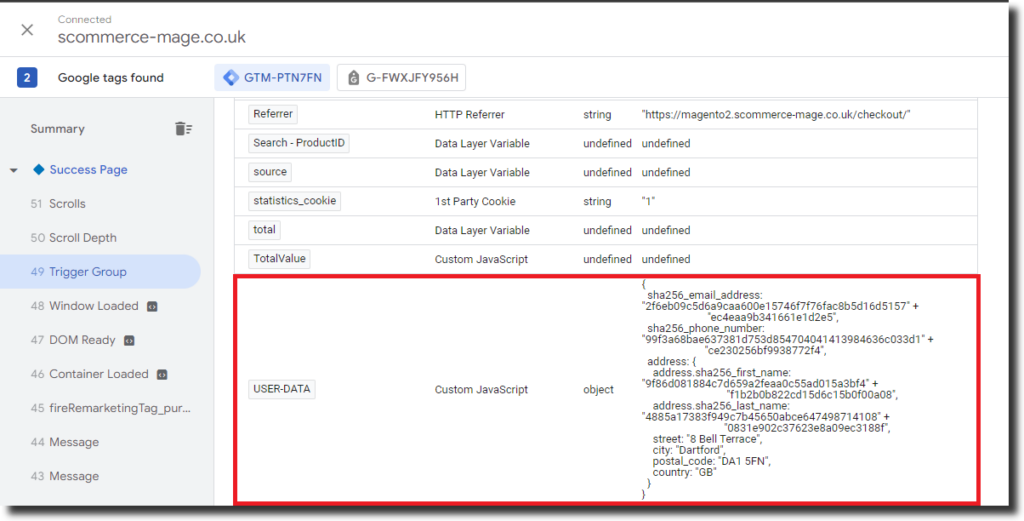
- In the custom Javascript section, paste the code shown below. It collects the PII information from the javascript object. Also, test the variable to make sure that the data is getting collected by using GTM’s preview mode.
function () {

return {

"sha256_email_address": conversionData.emailhash,

"sha256_phone_number": conversionData.phone_numberhash ,


"address": {

"address.sha256_first_name": conversionData.address.first_namehash,

"address.sha256_last_name": conversionData.address.last_namehash ,

"street": conversionData.address.street ,

"city": conversionData.address.city ,

"region": conversionData.address.region ,

"postal_code": conversionData.address.postal_code ,

"country": conversionData.address.country

}

}

}
- Next, check the ‘Include user-provided data from your website’ and select ‘New Variable’ from the dropdown.
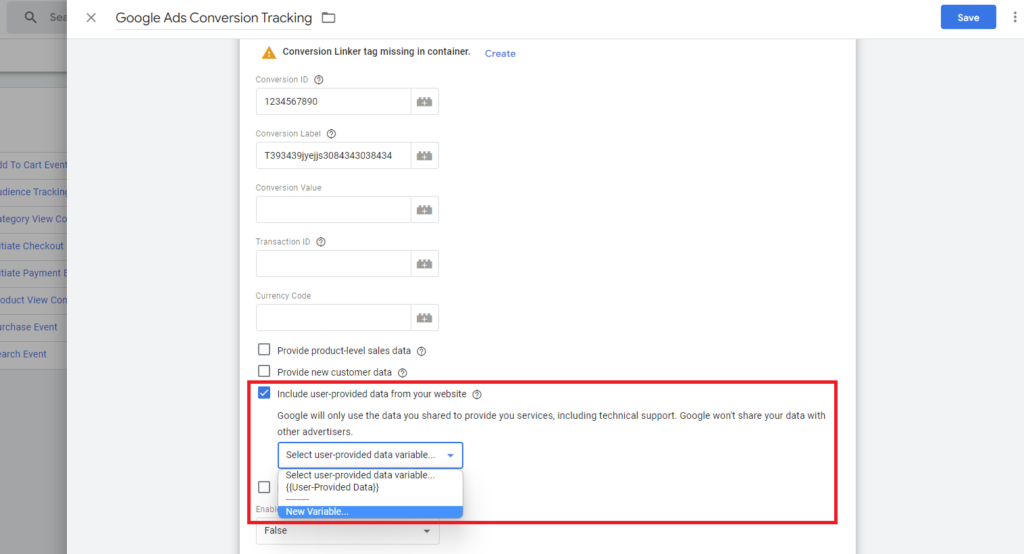
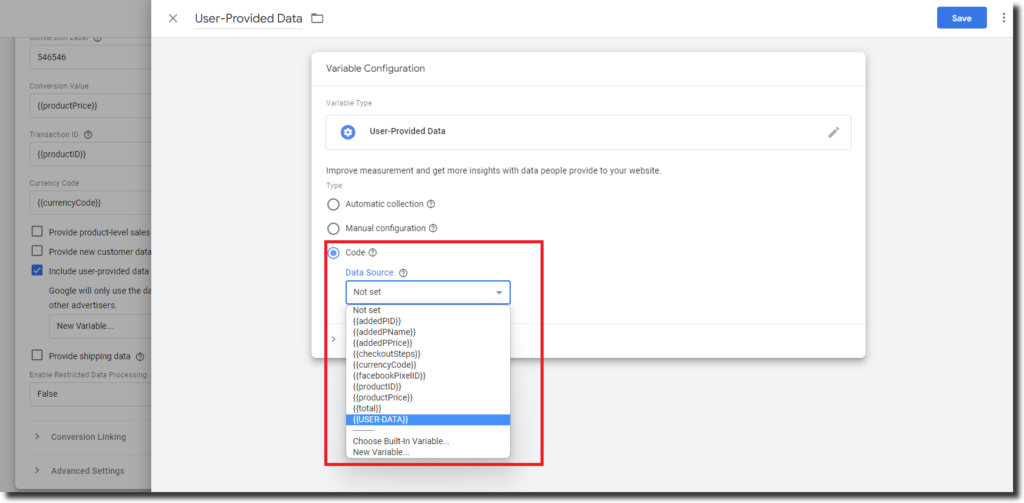
- Name the variable as ‘User Provided Data’ and select ‘Code’ in the type since we are pushing PII information through code. Now from the data source we will select our ‘USER-DATA’ variable which contains the PII data and lastly click on save to save the variabel.
Collect PII data using Data Layer Push
In the configuration if you have selected “Send Conversion Data using data layer” as “Yes” then the PII data can be seen in the data layer which looks similar as below :-
{
  event: "conversion_pii",
  gtm: {uniqueEventId: 3},
  ecommerce: null,
  conversionData: {
    email: "test1@testing.com",
    sha256_email_address: "cf1e74f7faca512cf4cda1ac04089360294cc27551" +
                          "f52416d68210a4cad21b26",
    address: {
      first_name: "Enhanced",
      sha256_first_name: "7bb5f6127ade404024d62362be078ec1165ce3eca9d" +
                         "a07044cd8e4a3a22b09d1",
      last_name: "Conversion",
      sha256_last_name: "1f04a8531a4639010704b201445ae5602c5d4933a5bb" +
                        "42ff10a7f6b938ae219a",
      street: "Google",
      city: "Ads",
      postal_code: "DA1 5FN",
      country: "GB"
    },
    phone_number: "07448644118",
    sha256_phone_number: "99f3a68bae637381d753d854704041413984636c033" +
                         "d1ce230256bf9938772f4",
    currency: "GBP",
    transaction_id: "WEB-000002866",
    revenue_with_vat_and_shipping: "55.00",
    revenue_without_vat_and_shipping: "45.83"
  }
}
Let us start by extracting each of the required information in a separate data layer variable. Please create the following data layer variables with the information provided with them:-
- Variable Name- Enhanced Conversion Value
- Variable Type:- Data Layer Variable
- Data Layer Variable Name:- conversionData.revenue_with_vat_and_shipping
- Variable Name- Enhanced Conversion Transaction ID
- Variable Type:- Data Layer Variable
- Data Layer Variable Name:- conversionData.transaction_id
- Variable Name- Enhanced Conversion Currency
- Variable Type:- Data Layer Variable
- Data Layer Variable Name:- conversionData.currency
- Variable Name- Enhanced Conversion Hashed Email
- Variable Type:- Data Layer Variable
- Data Layer Variable Name:- conversionData.sha256_email_address
- Variable Name- Enhanced Conversion Hashed Phone
- Variable Type:- Data Layer Variable
- Data Layer Variable Name:- conversionData.sha256_phone_number
- Variable Name- Enhanced Conversion City
- Variable Type:- Data Layer Variable
- Data Layer Variable Name:- conversionData.address.city
- Variable Name- Enhanced Conversion Country
- Variable Type:- Data Layer Variable
- Data Layer Variable Name:- conversionData.address.country
- Variable Name- Enhanced Conversion First Name Hashed
- Variable Type:- Data Layer Variable
- Data Layer Variable Name:- conversionData.address.sha256_first_name
- Variable Name- Enhanced Conversion Lastname Hashed
- Variable Type:- Data Layer Variable
- Data Layer Variable Name:- conversionData.address.sha256_last_name
- Variable Name- Enhanced Conversion Postal
- Variable Type:- Data Layer Variable
- Data Layer Variable Name:- conversionData.address.postal_code
- Variable Name- Enhanced Conversion Region
- Variable Type:- Data Layer Variable
- Data Layer Variable Name:- conversionData.address.region
- Variable Name- Enhanced Conversion Street
- Variable Type:- Data Layer Variable
- Data Layer Variable Name:- conversionData.address.street
Next create a user data variable with the following settings:-
Variable Name- User Provided Data
Variable Type:- User-Provided Data
Type:- Manual Configuration
Also, assign all the variables created in the previous step to their appropriate fields as shown below:-
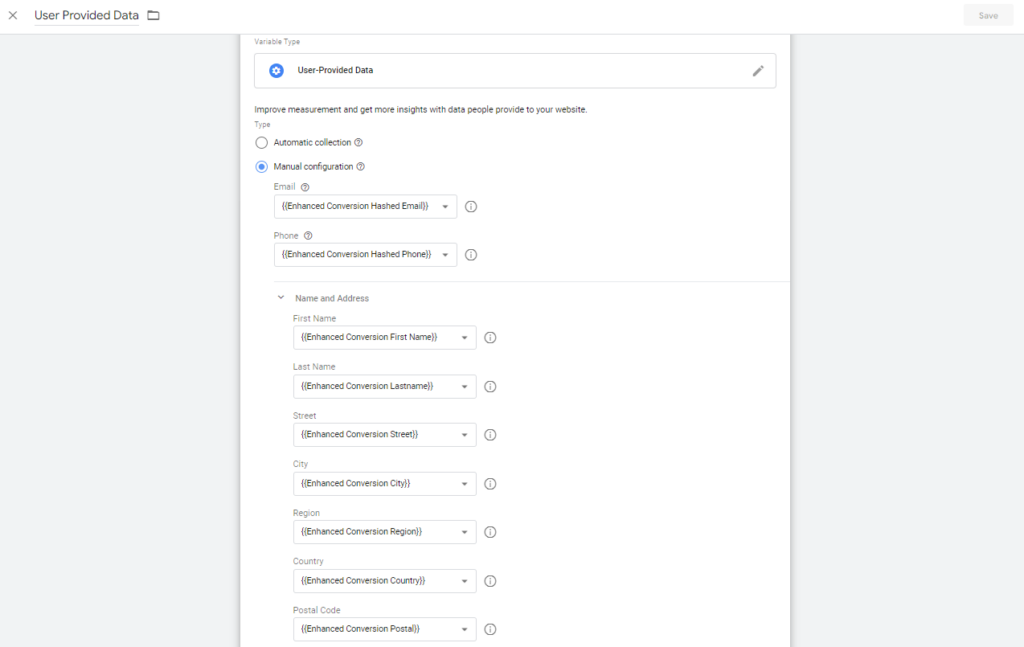
Next, check the ‘Include user-provided data from your website’ and select our newly created variable ‘User Provided Data’ from the dropdown.
Setting up the Trigger
- Click on Trigger and select the trigger which fires on the order success page. For our module we push both the GA4 purchase event as well as Google Adwords Purchase on the order success page so we will use the remarketing tag purchase trigger. In case we are collecting PII data through data layer then we will create the trigger with the following settings:-
- Trigger name:- conversion_pii
- Trigger Type:- Custom Event
- Event name:- conversion_pii
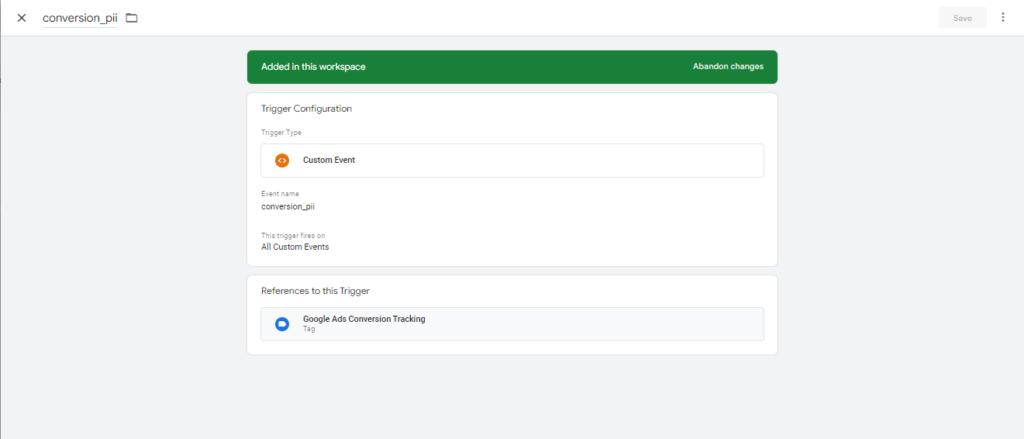
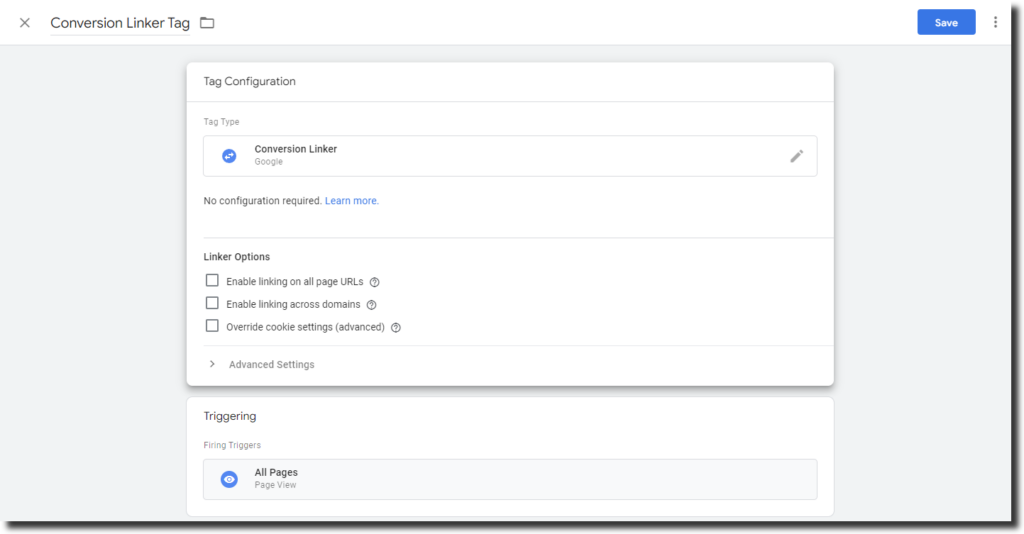
- You will see a warning on the tag which says ‘Conversion Linker Tag is missing’ click on the Create link next to it. It will automatically create the tag for you, simply name the tag and save.
Testing the Setup
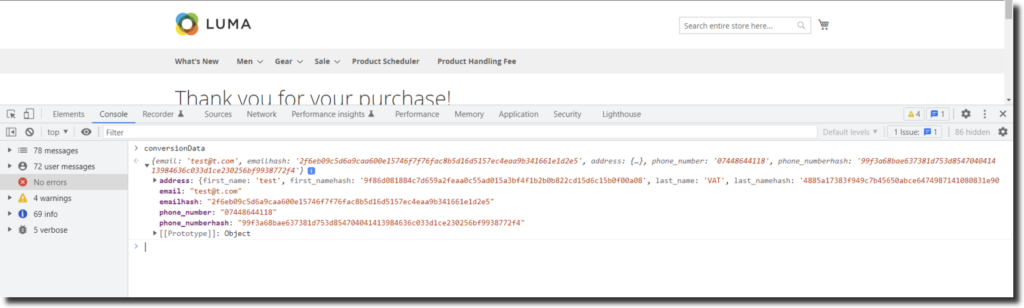
Global Javascript Variable setup
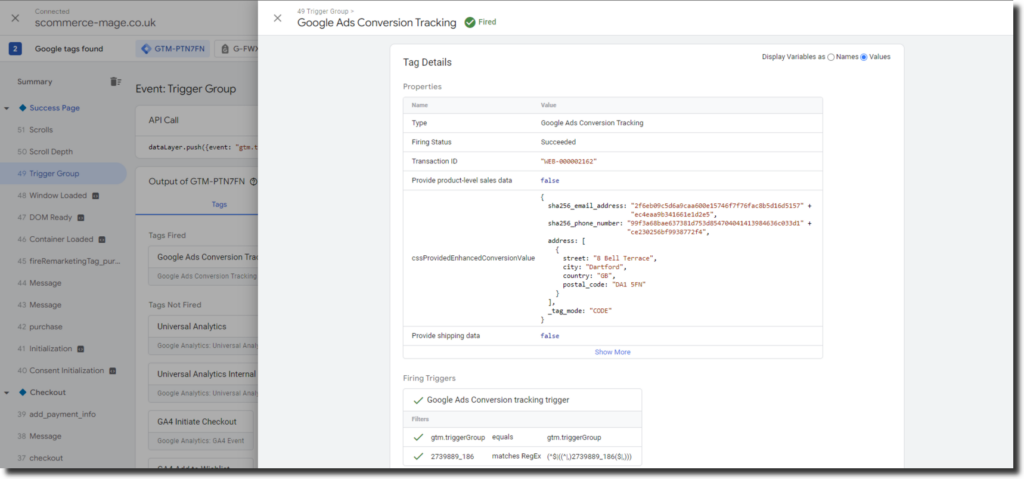
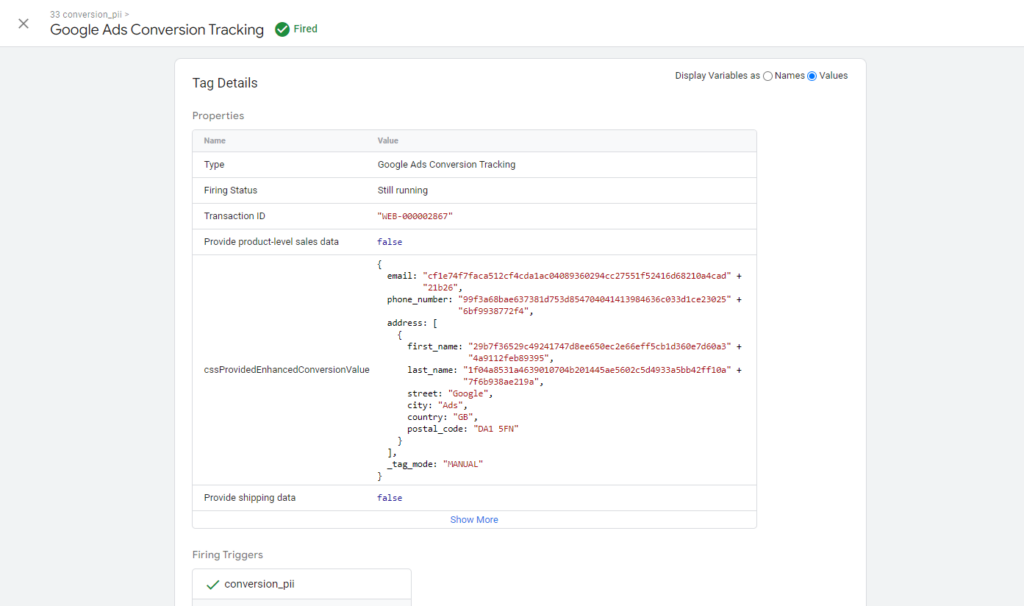
Now our GTM setup is ready, we can do a test purchase to make sure all the data is getting populated as well as our tag is firing correctly using the GTM preview mode. We can see in the below screenshot that our Google Ads Enhanced Conversion setup is working correctly.
PII Data using Data Layer Setup
In GTM, click on Preview button from the top right corner to open the preview mode and enter the URL of your store. Now in the tag assistant window we can see all the tags firing as we browse the site. Place an order and check the tag assistant once again on the success page. We can see that our Google Ads conversion tracking tag has fired successfully.
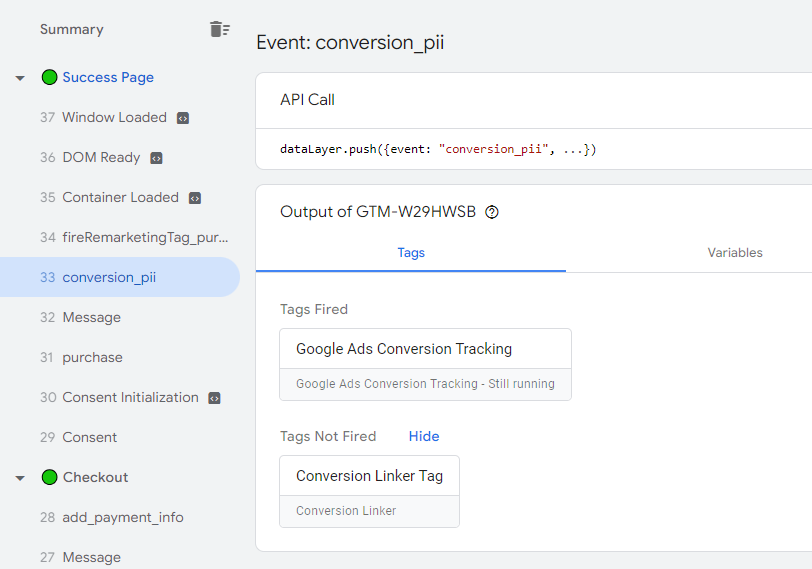
By clicking on the tag you can further check the data going with the tag is correct or not. Make sure to check the Values radio button on the top right corner.
Conclusion
This guide has enabled you to set up Google Ads Enhanced Conversion Tracking on your store. You can use the information provided in the guide to do the complete setup on your own. However, you will have to implement some code on your store if you are looking to do the setup all by yourself such as PII data as well as transaction ID, conversion value etc. If you do not want to go through the hassle of the entire setup you can check our Magento 2 Google Tag Manager extension which will implement all the necessary data layer code on your store once installed. We also provide GTM JSON import files which you can directly import and start using the tag immediately without having to perform all the steps mentioned above. You can see the demo and know for yourself:-